Showing posts sorted by relevance for query halloween. Sort by date Show all posts

Monday, October 1, 2007

Happy October all...


It is here, the weather has finally cooled and I feel it in the air, can you feel it?
Here comes Halloween.
Ghost and Goblins will give us a fright,
to spook and scare us in the night.
I am so inspired by this holiday. All the shops have theirs and now its time for me to make some frightful's for my shop around the corner. I'm hoping to have a few new things for my Etsy shop soon, a change is a comin, so be on the look out for that.
I'm working on Halloween things and I have a show next month so of course some Christmas too. I can't wait to show and tell my Santa's. I've been sketching all summer and can't wait to see how it all turns out.


Saturday, Hubby and I went for a "fall" drive on the Blue Ridge Parkway. Even though the leaves hadn't changed just yet, it was wonderful, and beautiful. It was like standing in heaven looking down. It was so peaceful, what a great time we had. We stopped for lunch at the Peaks of Otter, And sat by the lake below and just let the sun and crisp air wash over us. So peaceful, a perfect day.
We plan to go back again in mid October. We were told its when the leaves will have changed and will be even more beautiful.

Wednesday, July 15, 2015

Early-Work Mercantile Update... 


 Sold Out... Thank You so very much!
Feeling so Blessed tonight.
Hope you can stop by my
~Christmas In July~
 Blog Show.
I will have lots of Christmas & Fall Santa's 
Halloween Santa's & Pumpkin Head Fella's and more...
Date & Time coming soon.

XO
Becky


Wednesday, August 6, 2008

Just for fun...

Even though she's sold I wanted to share more pictures of Caroline.
Her Dress was made of an old baby Christening dress slip, and the lower part of her sleeve and under skirt was made of scrim. Under her dress and slip, she wore some old vintage doll bloomers I found on one of my Antique shopping trips. She was made of paper clay and her hair was natural cotton batting from an old quilt.
And I made a crown for her too, from an old drawer pull cut into a crown.
She was embellished with vintage mother of pearl buttons and organdy ribbon and she had tiny feather wings.


Just added to my ETSY Shop
I got into my soldering iron yesterday and made a few Halloween Charms.
front & back

This one is quite larger, like an ornament.
front & back

Good Day all, Becky

Saturday, August 27, 2016

A Re-Post...

A Halloween How To...


This Tutorial is always a Hit, so I just thought I'd Share it again. 
I've already made one batch this year, and gonna do another.
It is a fun project for all, give it a try and 
Enjoy! 

I have this little fun Project for you to try.
 I made these years ago and was just in the mood to make them again.
And I'd like to share it with you.
  
You will go from this...
To This...
Step 1.
Gather your Oranges,
 and cut the tops off. 
(save them for later)
Carefully, nice and straight now.
 Step 2.
Scoop and Scrape out all the insides,
Like So...
but be careful, not to rough, 
or you will get this...
This is what you should end up with...
Be sure to save the juice for Breakfast :o)
Step 3.
Get your tops, and
  carefully cut out the pulp from the tops too.

  And here you have it, empty Orange cups and lids...
Step 4.
Place all your hallowed out Oranges and Tops
on a Foil lined cookie sheet.
Step 5.
And here is where you will use your own judgment.
I baked mine at 275 degrees for 2-4 hours. 
Watching close so they don't over cook and burn.
Like my first batch did, HA!
So be sure to check on them every half hour or so after the first hour has passed. 
If they are to soft or burn to much, it will be difficult to carve the face later. 
Update Tip...
If you score and cut features half way through baking you will get another look to your Pumpkins. 
 Soooo, bake for a 1/2 Hour to an Hour or so and them carve face then return to Oven to finish baking.
Almost Ready...
You will want them just a little soft for carving easily and just a touch darkened.
They will shrink quite a bit.
See here...
Step 6.
Draw your Jack-o-lantern face.
I keep it simple here...
Very carefully use an X-acto knife to cut 
away pieces.  
(this part is not for the kiddos)

Step 7.
Poke a tiny hole one each side of your pumpkin, 
and run a rusty wire through and with pliers, curl the end of the wire to stay in place. 

 Step 8.
Glue in some moss and glue on the tops... 
Decorate as you wish.
 Update Tip... Or Add a little light inside.

Step 9... Enjoy!

Saturday, September 14, 2013

It's A Folk Art Show...


 I'll be joining the Folks at 
with some of my 
Original Handmade Folk Art Santas,  
Halloween items,and Primitive Goodes.
One Week From Today!
Hope you'll come see us!


Sunday, October 4, 2009

It's that Time of Year...

where all I can think about is the coming Holidays.
I'm Inspired ...

A new Blog Banner, Decorating for Fall, room re-do's for the season and of course Christmas. All the sewing and creating I'll be doing to the next couple months is exciting to think about. Santa's, Angels, what will they look like...Primitive, Whimsy... I can't wait.
Celebrating perfect Fall days...


Watching those favorite Halloween & Christmas movies, a chill in the air in front of a roaring fire, wool socks, and my Roxy laying across my feet keeping them warm.
And Dreaming of the snow that is to come, Brrr...

Well I've already started my Santa's a month or so ago.
So I'm well into my most Favorite time of year.


Vintage Pink Quilt Santa available soon here:

Thursday, October 10, 2019

Join Us Won't You...

For Some Fun Halloween Trick's & Treats!
On 
Today, October 10th at 
1:00pm ET, Sharp!
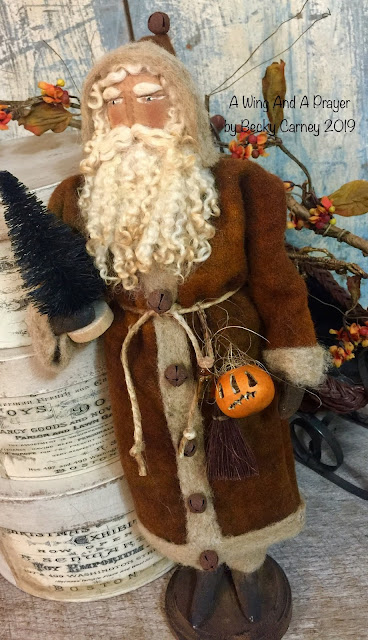
~Olde Hallow's Eve Santa~
will be there, and so much more. 
(click pic below for more info)
http://pfattmarketplace.com/awingandaprayer.html

Tuesday, October 2, 2012

A Re-Post...

A Halloween How To...

This Tutorial got a lot of attention this year, so I just thought I'd Share it again. 
I've already made one batch this year, and gonna do another.
It is a fun project for all, give it a try and 
Enjoy!
I have this little fun Project for you to try.
 I made these years ago and was just in the mood to make them again.
And I'd like to share it with you.
  
You will go from this...
To This...

Step 1.
Gather your Oranges,


 and cut the tops off. 
(save them for later)
Carefully, nice and straight now.
 Step 2.
Scoop and Scrape out all the insides,
Like So...
but be careful, not to rough, 
or you will get this...
This is what you should end up with...

Be sure to save the juice for Breakfast :o)

Step 3.
Get your tops, and
  carefully cut out the pulp from the tops too.


  And here you have it, empty Orange cups and lids...


Step 4.
Place all your hallowed out Oranges and Tops
on a Foil lined cookie sheet.

Step 5.
And here is where you will use your own judgment.
I baked mine at 275 degrees for 2-4 hours. 
Watching close so they don't over cook and burn.
Like my first batch did, HA!
So be sure to check on them every half hour or so after the first hour has passed. 
If they are to soft or burn to much, it will be difficult to carve the face later. 
Almost Ready...

You will want them just a little soft for carving easily and just a touch darkened.
They will shrink quite a bit.
See here...

Step 6.
Draw your Jack-o-lantern face.
I keep it simple here..

Very carefully use an X-acto knife to cut 
away pieces.


Step 7.
Poke a tiny hole one each side of your pumpkin, 
and run a rusty wire through and with pliers, curl the end of the wire to stay in place. 


 Step 8.
Glue in some moss and glue on the tops... 
Decorate as you wish.

Step 9...
Enjoy!


~